
On a cost-per-square-foot basis, a
bathroom is pretty darned expensive, which might account for people’s
tendency to skimp on bathroom lighting. But it’s in the bathroom, in
front of the mirror, where you begin and end each day. The bathroom
should be an enjoyable and functional space.
In too many bathrooms, a single overhead light fixture provides all the light. Unfortunately, this isn’t a good strategy. It casts unflattering shadows on your face and in corners of the room, and it’s not adequate for tasks like shaving and applying makeup.
In too many bathrooms, a single overhead light fixture provides all the light. Unfortunately, this isn’t a good strategy. It casts unflattering shadows on your face and in corners of the room, and it’s not adequate for tasks like shaving and applying makeup.
Light the surfaces
One of the most important things to remember about lighting is that you are not lighting the space bounded by the bathroom walls; you are lighting surfaces. Light bounces off walls, ceilings, floors, mirrors, and cabinets, and it is this reflected light that illuminates the room.Good lighting demands a five-part strategy
• Use layers of light.• Consider the reflected light that bounces off surfaces.
• Use plenty of light where it’s needed the most.
• Choose appropriate colors for the walls, ceilings, and fixtures.
• Take the size and shape of the room into account.
Textures in a bathroom should create interesting shadowlines but not objectionable dark spots. Regardless of a textured surface’s effect on the quality of light, choose materials that continue to feel and look clean over time despite the large amount of moisture in the room. (For example, some unfinished wood surfaces will look and feel mildewy, and deep reveals in tongue-and-groove boards might appear to harbor mold.)
As with the other rooms in a house, light the bathroom with layers, using ambient, task, and accent lights. Layering the light helps to eliminate unwanted shadows, ensures that there is enough light for specific jobs or functions, allows for different intensities of light to suit different users and activities, and creates a sense of drama.
Bathrooms are often too small for the fourth layer of lighting, dedicated decorative lights. However, a beautiful or interesting fixture providing ambient, task, or accent light might also serve as decorative lighting. Controlled by a dimmer, the fixture can switch between its primary role and a decorative role.
During the day, the skylight and the
window let the sun stream in. Privacy glass in the door and a transom
window allow the bathroom to borrow light from the hallway or an
adjacent room. These “relites” are an effective way to bring light into
the room and establish a connection with other spaces. This also makes
the bathroom feel a bit more expansive.
There are two sources of artificial ambient light: the overhead fixture and secondary cove lighting, which are both dimmable to supplement sunlight at dawn and dusk.
At night, a skylight becomes a black hole. To counteract this, a dimmable cove light bounces light into the well, replicating the feeling of natural light streaming though the skylight. The skylight well is also a good place to put the fan. It’s hidden from view when you enter the bathroom, and the integrated light tucked high up makes a great night-light.
In this bathroom, the light-green colors help to reflect light and reinforce the outdoor connection that’s made through the window and the skylight.
Start with ambient light
Ambient lighting is general illumination. Ideally, this nondirectional light comes from a combination of natural and artificial light. You should look to daylight as your first lighting choice. That can be tough in bathroom; many lack an exterior wall. Even with an exterior wall, window space is limited by privacy concerns and the need to pack a sink, shower and/or tub, and toilet into the space.I often look skyward to bring in natural light. Skylights, both the traditional and tube types, supplement windows and bring light to landlocked rooms. While tubular skylights are compact, flexible, and virtually leakproof, I find the lightwell of a traditional skylight especially useful in the bathroom. Sunlight reflects off the sides of the well, creating a nice, even light around the room. I typically splay the lightwell to allow more light into the bathroom.
As important as it is to have good day-lighting, the bathroom receives the heaviest use on the shoulders of the day, so artificial light is required. It can come from an overhead fixture, recessed cans, wall sconces, cove lights, valances, or a combination of these choices. For small and moderate-size bathrooms without alcoves or L-shaped layouts, you might find that a single overhead fixture works well for ambient light. In large or irregularly shaped bathrooms, you’ll need additional fixtures like recessed cans or cove lights.
For ambient light, designers use the rule of thumb of 1w of incandescent light, or its compact-fluorescent equivalent, for each square foot of floor. Put ambient lights on a dimmer so that they can account for daylight and for your mood. (Consider the amount of light you’d want for an evening bath versus the workweek morning routine.) Adjustable light levels also let older and younger folks find the precise level of light they need for nighttime trips to the toilet. Finally, dimmers let you mix the level of ambient light with task and accent lighting to create patterns of shadow and light, an interplay that adds interest and drama.
Good lighting is part fixture location and
part bathroom design. In this case, the glass enclosure lets task
lighting above the shower and tub spill across boundaries. The soffit
houses the task lights for the vanity and toilet, and it also creates a
shadow along its intersection with the ceiling. By compressing the space
above these task areas and creating a border of shadow and light
between the task zones and the rest of the bathroom, the toilet and
vanity areas feel warmer and the scale more comfortable. The overhead
vanity light is directed at the mirror, so it doesn’t cast shadows on
the face. The vertical lights provide cross illumination.
When you choose trim kits for recessed cans, skip the white step baffle because it’ll be too bright and pull your eye to the ceiling. A gold baffle enhances wood cabinets and skin tones by casting a warm glow. A black baffle reduces glare and helps to camouflage the can, and a clear baffle works in modern baths with white and metallic finishes.
When you choose trim kits for recessed cans, skip the white step baffle because it’ll be too bright and pull your eye to the ceiling. A gold baffle enhances wood cabinets and skin tones by casting a warm glow. A black baffle reduces glare and helps to camouflage the can, and a clear baffle works in modern baths with white and metallic finishes.
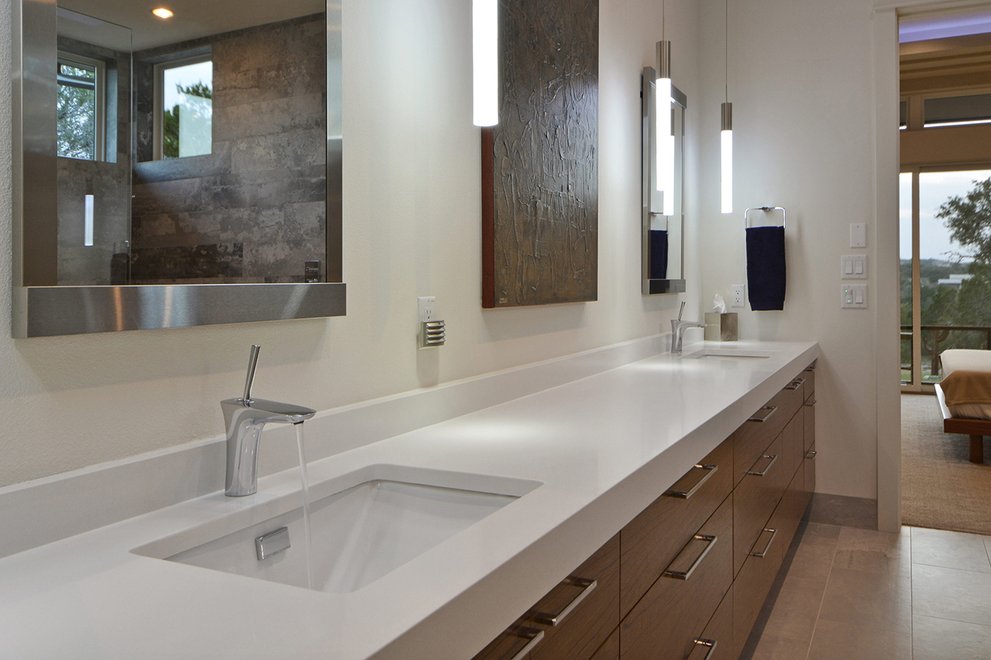
Avoid shadows at the mirror
Vanity lighting is the most important task lighting and can make or break your bathroom experience. A light, or row of lights, above the mirror to light your face creates shadows under your eyes, cheekbones, nose, and chin that make you look tired, heavier, and older. Cross illumination is much more flattering. By placing vertical lights at eye level on both sides of the face, you eliminate shadows. Generally, use lights with some sort of shielding here, whether it’s frosted glass, acrylic fabric, or some other material. Especially if it’s a fluorescent bulb, this softens the light and adds warmth. Be sure to choose a light fixture with a finished look to the back if it will be reflected in the mirror.Other areas that require task lighting are the tub and/or shower, as well as a light at the toilet for reading. Often, these lights will be recessed cans, which have a wide range of trim kits available. Because the lights over the tub and shower have to be vaporproof, I generally use a diffuser on all task lights for consistency. Plastic lenses yellow over time, so use glass.
Highlight beauty
Accent lighting emphasizes an object or a surface; the fixture itself is discreet. Typically, I use accent lights in two ways: One is to call attention to beautiful surfaces, and the other is to highlight artwork. You might be thinking, “Wait a minute. Artwork in the bathroom?” But if there are no windows, a photo or painting can replace the connection to the outdoors. Lighting framed art or something sculptural creates depth and shadow that the eye welcomes. You can accomplish the same thing by highlighting the materials you splurged on, whether it’s the wall tile or a tongue-and-groove ceiling.Layering three lighting types means that you could be using different light technologies. It’s important that the quality of light—the temperature and color-rendering ability—match regardless of its source. The color temperature of incandescent light is 2700 kelvin, a warm (yellowish) hue that makes skin look good. If you use fluorescent, LED, or halogen bulbs, their color temperatures must match each other and should be the same as an incandescent lamp. Plus, they should have a color-rendering index of at least 82—higher if it’s available.
In this bathroom, lights call attention to the curved tongue-and-groove ceiling, the wall tile, and the artwork above the toilet. There is no dedicated ambient-lighting fixture. Rather, accent and task lights combine for general illumination.
Recessed lights with a wall washer or gimbal ring trim create pockets of light on the wall to call attention to artwork or surfaces, in this case the tile. Don’t be afraid to think outside the box: An outdoor sign light highlights the framed artwork.
Because this bathroom has no natural light, a pale-yellow color is used on the walls to reflect light and add a warm hue. Lighting the arched wood ceiling with uplights and strip cove lighting also adds warm tones to help replace the sense of natural light.