


In this post I will describe how to build the ideal shower starting with the rough framing. The ideal shower doesn’t need to have the biggest rain shower head, it needs to be well designed and built to last. A bathroom is a wet place. In the summer it’s hard to get rid of the moisture, and in the winter it could get pulled into your walls, only to condense and cause rot and mold. The ideal shower is comfortable, can stand up to long steamy showers, and is easy to clean. Here are some tips for building your ideal shower.
1. Start with a solid base
In the rough framing stage, make sure that any joists that are cut for drain lines are reinforced and that a 3/4” plywood substrate is glued and nailed down. Over the plywood you’ll install cement board or a mortar bed, but the framing and plywood underneath need to be rock solid. Movement could mean cracking grout or tiles. A good size for a shower is 36” wide and 42” long.
2. Make sure walls are plumb and that corners are perfect
A drywalled wall in a bedroom doesn’t need to be framed perfectly, but get the walls wrong at the framing stage in your shower, and you’ll know when the tile goes in. You’re going to be spending a lot of time standing in there looking at those lines so make sure they’re true.
3. Tile will not stop water
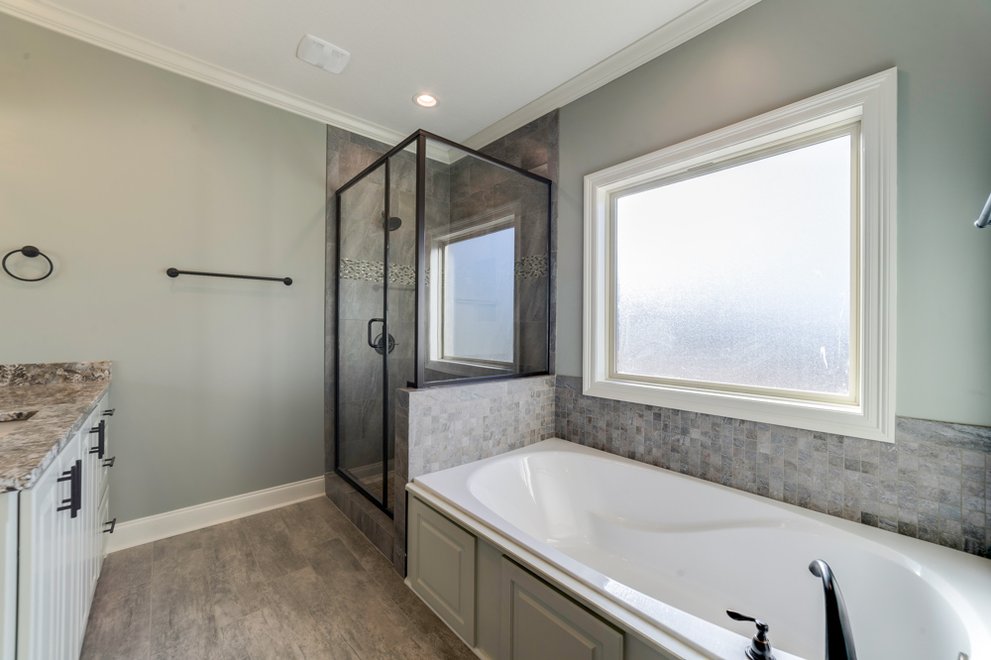
Though the tile on the floor and walls will stop most of the water from getting through, it does not stop all of it. Remember this when you plan what happens before tile goes in. Cement board is far superior to drywall as a substrate for tile. It can handle getting wet, which even moisture resistant drywall really can’t. But cement board is not enough. Cement board will soak up that moisture and take a while to dry. If it’s wet enough, the wood behind it can get wet. The longer it takes your walls and floor to dry out, the harder it is going to be to keep them clean and mold free. A waterproofing membrane will stop water right behind the tile. There are types that can be painted on to the cement board; an example is shown below.
This construction shot is the before image of the same shower that is shown below (here one drain is for the shower; the other for the toilet).
There are also fabric membranes that can be applied over drywall or cement board. Your shower pan should have a liner under the mortar bed and that liner should have a pre-slope, an incline that directs any water that gets to the liner to the weep holes in the drain.
4. Grout gets dirty
This may seem obvious, and there are many sealers and products that purport to keep your grout from getting dirty. I find it easier to assume that grout will get dirty and plan accordingly. White grout on the floor will not be white for long. A grey or off-white grout will wear much better. The more grout you have, the more you have to clean. Small tiles mean more grout lines and small round tiles mean even more. Unless you have a linear drain though, you will need small tiles in the shower to achieve pitch in multiple directions. There are many linear drain options available if you choose to go that route. Choose one that your installer has used before and expect to pay more than a standard shower floor install. I find a mosaic shower floor with grey grout -- as shown below -- provides a slip resistant surface that is relatively easy to clean.
5. Plan the shower around your body and habits
Your shower head, controls, niches, bench – these should all be placed where they feel comfortable to you. Stand in the rough framed shower and act out a shower. I recommend checking in to a nice hotel or resort and taking notes on high end shower features. I don’t like the sensation of showering under a rain shower head, but some do. You won’t know until you try, and once it’s plumbed in, it’s too late to redo. If you want a bench, think about how you will use it. Is it primarily a place to store products – a small tiled bench will do. 18” high, 12” deep. Is it just a place put a foot up during shaving – a flip down teak bench could be a good option.
6. Plan for a fan
By code, a bathroom with a window doesn’t need an exhaust fan. In practice, a window rarely functions well enough to clear a bathroom of moisture. In the winter it’s too cold and in the summer too humid. Every bathroom should have a good bath fan on a timer switch. I recommend the Panasonic line of bath fans and a timer switch that can leave the fan on up to at least one hour to clear all the moisture out of the bathroom. This will aid in keeping the bathroom mold and mildew free. Also, get a squeegee for the shower glass. Wipe that water down the drain and your fan will have less work to do and you’ll need to clean the shower glass less often.
There are other things I haven’t mentioned that may be what you think of when you think of your ideal shower, like multiple body sprays for instance. Just make sure you cover the six points I mentioned above before you start dreaming of your own personal car wash.
To see a wide range of shower pan and drain options Google shower pans or go to Tile Redi.com
For a collection of bathroom plans click here.
1. Start with a solid base
In the rough framing stage, make sure that any joists that are cut for drain lines are reinforced and that a 3/4” plywood substrate is glued and nailed down. Over the plywood you’ll install cement board or a mortar bed, but the framing and plywood underneath need to be rock solid. Movement could mean cracking grout or tiles. A good size for a shower is 36” wide and 42” long.
2. Make sure walls are plumb and that corners are perfect
A drywalled wall in a bedroom doesn’t need to be framed perfectly, but get the walls wrong at the framing stage in your shower, and you’ll know when the tile goes in. You’re going to be spending a lot of time standing in there looking at those lines so make sure they’re true.
3. Tile will not stop water
Though the tile on the floor and walls will stop most of the water from getting through, it does not stop all of it. Remember this when you plan what happens before tile goes in. Cement board is far superior to drywall as a substrate for tile. It can handle getting wet, which even moisture resistant drywall really can’t. But cement board is not enough. Cement board will soak up that moisture and take a while to dry. If it’s wet enough, the wood behind it can get wet. The longer it takes your walls and floor to dry out, the harder it is going to be to keep them clean and mold free. A waterproofing membrane will stop water right behind the tile. There are types that can be painted on to the cement board; an example is shown below.
This construction shot is the before image of the same shower that is shown below (here one drain is for the shower; the other for the toilet).
There are also fabric membranes that can be applied over drywall or cement board. Your shower pan should have a liner under the mortar bed and that liner should have a pre-slope, an incline that directs any water that gets to the liner to the weep holes in the drain.
4. Grout gets dirty
This may seem obvious, and there are many sealers and products that purport to keep your grout from getting dirty. I find it easier to assume that grout will get dirty and plan accordingly. White grout on the floor will not be white for long. A grey or off-white grout will wear much better. The more grout you have, the more you have to clean. Small tiles mean more grout lines and small round tiles mean even more. Unless you have a linear drain though, you will need small tiles in the shower to achieve pitch in multiple directions. There are many linear drain options available if you choose to go that route. Choose one that your installer has used before and expect to pay more than a standard shower floor install. I find a mosaic shower floor with grey grout -- as shown below -- provides a slip resistant surface that is relatively easy to clean.
5. Plan the shower around your body and habits
Your shower head, controls, niches, bench – these should all be placed where they feel comfortable to you. Stand in the rough framed shower and act out a shower. I recommend checking in to a nice hotel or resort and taking notes on high end shower features. I don’t like the sensation of showering under a rain shower head, but some do. You won’t know until you try, and once it’s plumbed in, it’s too late to redo. If you want a bench, think about how you will use it. Is it primarily a place to store products – a small tiled bench will do. 18” high, 12” deep. Is it just a place put a foot up during shaving – a flip down teak bench could be a good option.
6. Plan for a fan
By code, a bathroom with a window doesn’t need an exhaust fan. In practice, a window rarely functions well enough to clear a bathroom of moisture. In the winter it’s too cold and in the summer too humid. Every bathroom should have a good bath fan on a timer switch. I recommend the Panasonic line of bath fans and a timer switch that can leave the fan on up to at least one hour to clear all the moisture out of the bathroom. This will aid in keeping the bathroom mold and mildew free. Also, get a squeegee for the shower glass. Wipe that water down the drain and your fan will have less work to do and you’ll need to clean the shower glass less often.
There are other things I haven’t mentioned that may be what you think of when you think of your ideal shower, like multiple body sprays for instance. Just make sure you cover the six points I mentioned above before you start dreaming of your own personal car wash.
To see a wide range of shower pan and drain options Google shower pans or go to Tile Redi.com
For a collection of bathroom plans click here.